News: Welcome back to Bullworth! If you haven't already, you will need to reset your password..


Author Topic: TUTORIAL- Importing Custom Models into Bully  (Read 17162 times)

0 Members and 1 Guest are viewing this topic.

Offline -мα∂нαттяι¢к-

  • Full Member
  • ***
  • Posts: 254
    • View Profile
Re: TUTORIAL- Importing Custom Models into Bully
« Reply #15 on: July 15, 2013, 06:05:27 AM »
@Walter20210: Haha that thing is awesome man, great work. Maybe we could get all the manhunt weapons and make some sort of mod out of it. I remember a weapon like that in manhunt, not sure if 1 or 2.

Rambo7: On step 2, extract the .nif. The .nft is not a model, its the texture file. For step 4, that's happening because your replacing a model with multiple parts. You just replace one part and remove the rest. I reccomend you start by replacing a melee weapon, like the yardstick. If you really want to replace one of the guns, the bottle rocket launcher is much easier.

Offline Rambo7

  • "Awesomely Kick-Ass Troll"
  • Full Member
  • ***
  • Posts: 404
  • Gender: Male
  • #ZAMBess
    • View Profile
    • My ModDB Page
Re: TUTORIAL- Importing Custom Models into Bully
« Reply #16 on: July 15, 2013, 09:15:15 AM »
Epic Fail again  :blank:
I tried to change the yardstick to lightsaber, I can import the lightsaber model now, but fail at texture, the lightsaber still pink
I think I make mistake at step 7-10
7) You only really need to replaced the diffuse (_d) texture, which controls the colors. So rename your texture for the model to match the name of the _d texture in the model. For example if it says yardstick_d.tga in the model, rename your model to say the same.
8 ) Right click the _d texture in the model and select Texture/choose.
9) In the window that pops up, choose your texture which you renamed.
10) Save the .nif model with the same name it started with.
Thanks
« Last Edit: September 09, 2013, 06:09:33 AM by Rambo7 »

Offline -мα∂нαттяι¢к-

  • Full Member
  • ***
  • Posts: 254
    • View Profile
Re: TUTORIAL- Importing Custom Models into Bully
« Reply #17 on: July 15, 2013, 09:55:43 AM »
Sorry if this is confusing for you, I really should re-do this tutorial with pictures or as a video at some point.
OK here's what you need to do:
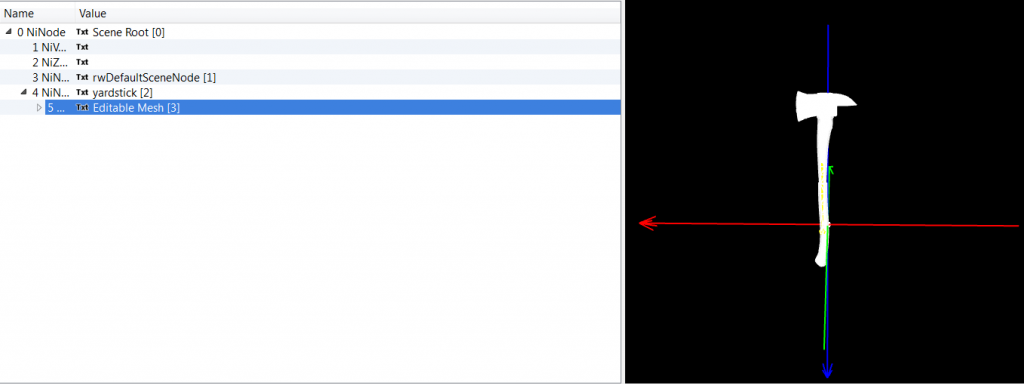
Open a clean yardstick.nif file, and open it in nifskope. Go to NiNode, the one to the 4 next to it, NOT the 0. Click the arrow to show the contents. Under it should be Editable Mesh, click on that. It should look like this ( but with the yardstick model on the right, I have already replaced it.

Now, with editable mesh selected, click file/import/import OBJ, and choose your .obj saber model. Now you'll see you're saber model on the right, like you had before. Now click the arrow next to editable mesh to open up the contents.
Now, you need to take the saber texture you had and convert it to a tga. You can't just rename  it to tga, it doesn't work. Use this online converter: http://image.online-convert.com/convert-to-tga . Now take that saber texture that you just converted to .tga, and rename it to WP00_yardstick_d.tga . Now go back to nifskope. You've already opened up the contents of editable mesh so you should see a line that says txt with an arrow to the left of it. The first to txt lines are not the right ones. Open up the contents of this txt line, and you'll see 3 textures. Select the first one. It should look like this (Again, I've already replaced the model and texture, you're first line will read WP00_yardstick_d.tga for now, mine doesn't)

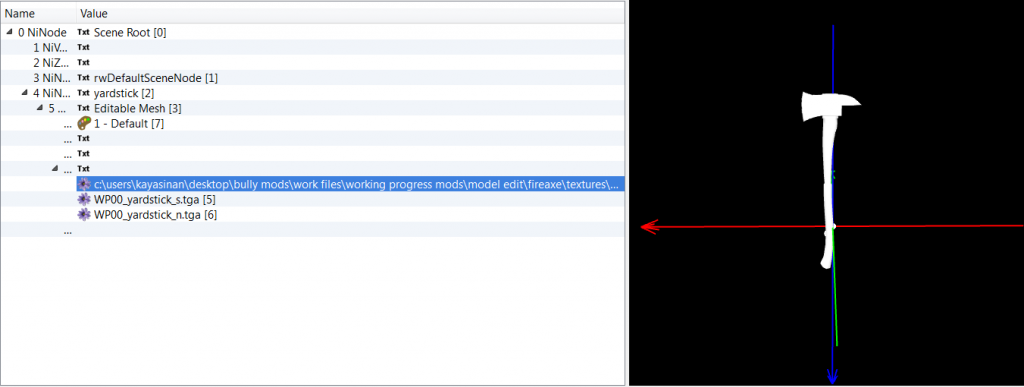
Right click the first texture and select texture/choose. Now select your WP00_yardstick_d.tga, the one you converted and renamed. I usually embed the textures, though it isn't necessary.

Now you're done with the .nif file, but you aren't done yet. Save the .nif and put it in a new folder (otherwise names change when you rename the .nft in a second).

Go back to imgtool and extract yardstick.nft . Now rename it to yardstick.nif and open it up in Nifskope. This part is just like texture editing. Again, right click the first texture and select texture/choose. Again, choose your converted and renamed WP00_yardstick_d.tga . Now embed it, and your done. Save the the file, and rename it back to yardstick.nft . NOW you're done. Delete the original yardstick.nif and yardstick.nft in imgtool. In imgtool, click commands/add and choose your two new files. Once you go ingame, you should have a light saber instead of a yardstick.

Offline Rambo7

  • "Awesomely Kick-Ass Troll"
  • Full Member
  • ***
  • Posts: 404
  • Gender: Male
  • #ZAMBess
    • View Profile
    • My ModDB Page
Re: TUTORIAL- Importing Custom Models into Bully
« Reply #18 on: July 15, 2013, 01:29:56 PM »
Thanks for the more detail tutorial MadH, it helped a lot
Manage to do it, but with other model "axe"
Still no luck with the lightsaber,

Got some question Mad how do you rotate or move the model in nifskope??
« Last Edit: September 09, 2013, 06:10:25 AM by Rambo7 »

Offline -мα∂нαттяι¢к-

  • Full Member
  • ***
  • Posts: 254
    • View Profile
Re: TUTORIAL- Importing Custom Models into Bully
« Reply #19 on: July 15, 2013, 01:41:04 PM »
Glad that you figure it out.
What you have to do to rotate it is simple. Go to editable mesh again, and click Transform/edit. Under rotation, go to R, and set it to 90 or -90 (whichever works). That should work, if not try rotating the Y or P. Once you rotate it you're probably going to need to move it down to get it centered on the axis. For this go to Translation, then Z. Try something like -0.2. You have to adjust it until seems right.

There must have been a problem somewhere in the saber model or texture, I'm not sure.

I've never really had an issue with the game crashing after model replacing. I would try rebuilding your archive in imgtool.

Offline Walter20210

  • Hero Member
  • ****
  • Posts: 1,102
  • Gender: Male
  • I keep loving the old things :P
    • View Profile
    • YouTube Account
Re: TUTORIAL- Importing Custom Models into Bully
« Reply #20 on: July 15, 2013, 05:29:49 PM »
@-мα∂нαттяι¢к-
Thats a good idea =D
Maybe we can separate what weapons we are going to rig.

Offline -мα∂нαттяι¢к-

  • Full Member
  • ***
  • Posts: 254
    • View Profile
Re: TUTORIAL- Importing Custom Models into Bully
« Reply #21 on: July 15, 2013, 06:53:11 PM »
We could do some retextures to make the characters, and add some more manhunt elements to Bully.

Offline Walter20210

  • Hero Member
  • ****
  • Posts: 1,102
  • Gender: Male
  • I keep loving the old things :P
    • View Profile
    • YouTube Account
Re: TUTORIAL- Importing Custom Models into Bully
« Reply #22 on: July 15, 2013, 07:02:03 PM »
Yeah =D

We can use the textures of the game.

Offline Walter20210

  • Hero Member
  • ****
  • Posts: 1,102
  • Gender: Male
  • I keep loving the old things :P
    • View Profile
    • YouTube Account
Re: TUTORIAL- Importing Custom Models into Bully
« Reply #23 on: August 10, 2013, 03:33:43 PM »
I got a problem now :/

Every texture that i change doesnt load fine. It loads weird. D:

Example :

Offline -мα∂нαттяι¢к-

  • Full Member
  • ***
  • Posts: 254
    • View Profile
Re: TUTORIAL- Importing Custom Models into Bully
« Reply #24 on: August 11, 2013, 02:49:47 AM »
That started happening to me too. I hope there is a fix

Offline Unstoppable12

  • Jr. Member
  • **
  • Posts: 15
  • Gender: Male
    • View Profile
Re: TUTORIAL- Importing Custom Models into Bully
« Reply #25 on: August 22, 2013, 05:01:53 AM »
hello mad, please help, i did this too but when i load the game the weapon looks so big, its just too big i dont like it please help i dont know how to fix

Offline Rambo7

  • "Awesomely Kick-Ass Troll"
  • Full Member
  • ***
  • Posts: 404
  • Gender: Male
  • #ZAMBess
    • View Profile
    • My ModDB Page
Re: TUTORIAL- Importing Custom Models into Bully
« Reply #26 on: August 22, 2013, 05:34:19 AM »
U just need to scale it,
and I had already make a tutorial about this
http://www.bully-board.com/index.php?topic=19019.0

Offline Unstoppable12

  • Jr. Member
  • **
  • Posts: 15
  • Gender: Male
    • View Profile
Re: TUTORIAL- Importing Custom Models into Bully
« Reply #27 on: August 22, 2013, 05:44:37 AM »
but all of the scale is already 1, which scale should i put so that it become normal

Offline Rambo7

  • "Awesomely Kick-Ass Troll"
  • Full Member
  • ***
  • Posts: 404
  • Gender: Male
  • #ZAMBess
    • View Profile
    • My ModDB Page
Re: TUTORIAL- Importing Custom Models into Bully
« Reply #28 on: August 22, 2013, 05:52:22 AM »
U must adjust it your own, until u find the correct size
put it 0.1 or 0.01 or anything smaler than that
« Last Edit: August 22, 2013, 05:53:57 AM by Rambo7 »

Offline Unstoppable12

  • Jr. Member
  • **
  • Posts: 15
  • Gender: Male
    • View Profile
Re: TUTORIAL- Importing Custom Models into Bully
« Reply #29 on: August 22, 2013, 06:04:58 AM »
hey man...  :D can i...  :jajaja:
can u teach me how did u import the other character/ped model to the game  :laugh:
 :cheernutz:
hehehehehe you're so cool
« Last Edit: August 23, 2013, 12:11:38 AM by Unstoppable12 »