Note: I think I will make a video about this
and if you guys want to make a video using my method here, be my guest but please make a link reference to my tutorial thread here
Tools:Note:
-I recommend you to watch this GTA SA rigging video first since bully rigging process with GTA rigging process is actually the same, the only difference is in the importing, exporting, shader (vertex paint), adding the finished model to the .nif file, and adding the texture to the .nft file
Note: Credit goes to the original video creator
Watch this rigging process (in the mediafire link below), from min 00:36 to 09:54, it basicly will cover my tutorial from step 3 to step 6
Note: I uploaded the video in mediafire, because the original video already dead
http://www.mediafire.com/download/qhtnuz7scxpx7y7/%E2%96%B6+San+Andreas+Ped+Rigging+Video+Tutorial+-+YouTube.7zand Here is another GTA SA, if you want to watch it:
https://www.youtube.com/watch?v=8m7uV9eliIUStep:
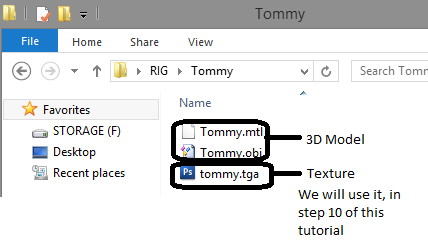
1. Prepare the model that you want to rig (The Mesh) in this eg. It is Tommy (its 3d model and texture file)
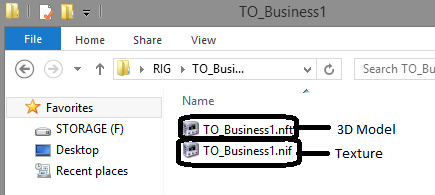
and the bully ped model that we will rig to (The Donor) in this eg. It is TO_Business1 (its .nif/model & .nft/texture file). Use IMG Tool 2.0 to extract the model from Bully:SE World.img file
Note: I will use the term “the mesh” and “the donor” for the rest of the tutorial
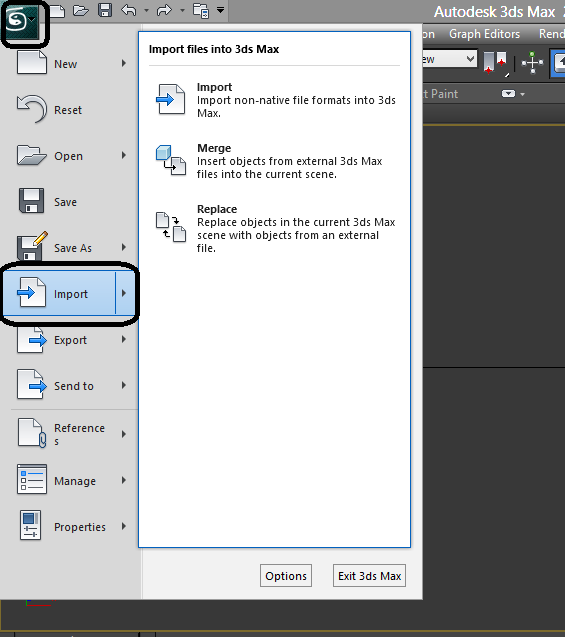
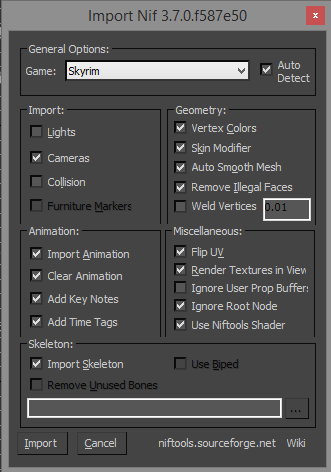
2. Open 3DS Max, Import “the mesh” model and import “the donor” model (its .nif file), for the nif import setting just use the default setting cause it doesn’t really matter.
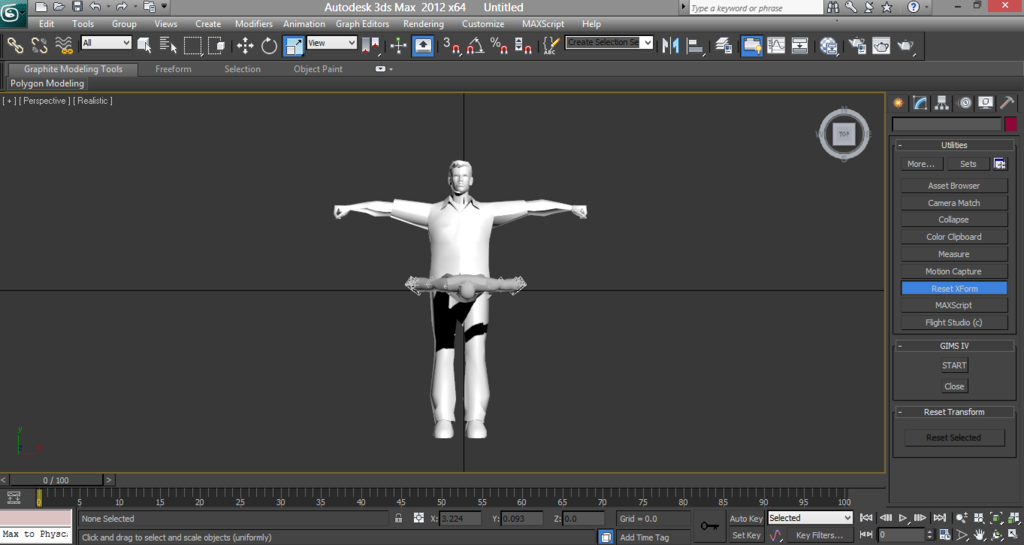
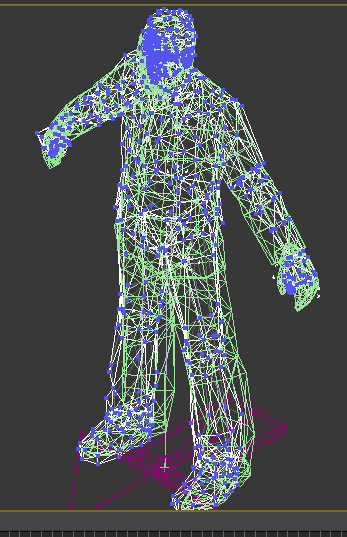
3. Now we need to make “the mesh” to match “the donor” from its rotation, scale, and translation
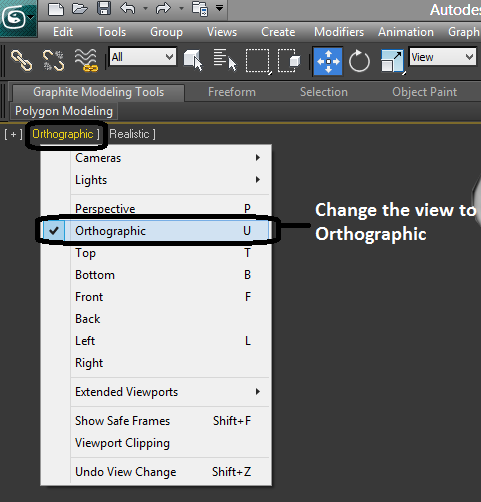
Note: change your view from perspective to orthographic (if you haven't set it), it will help you easier to transform (rotation, scale & translation) “the mesh” to match “the donor”
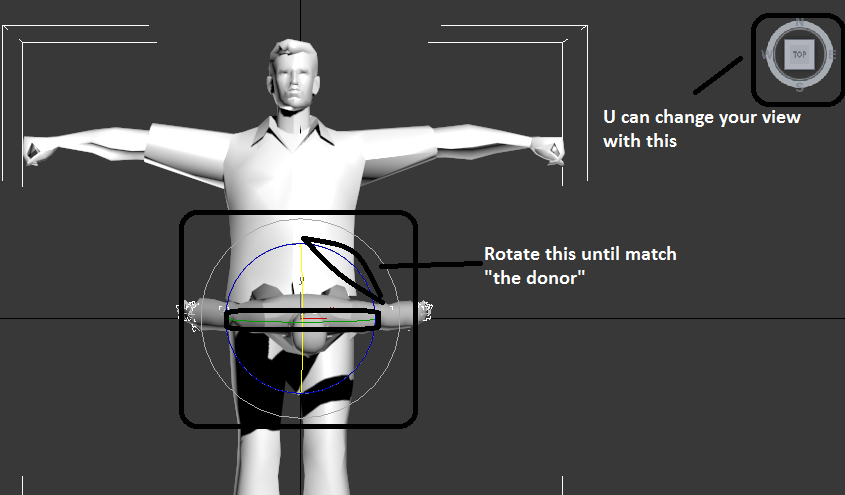
-Click “the mesh” and rotate it until it match “the donor”, for rotate just click “the mesh” and press “E Key” on your keyboard. There is two way to rotate “the donor”, u can use either one of this method (method a or b)
Note. You can press the “Q Key” on your keyboard to return to “select object”
a. See there’s like a round thing in the middle of “the mesh”, it is called the rotate manipulator. It has X,Y, Z plane, so just click and drag to rotate “the mesh” until match “the donor”. Note: you can change your view by clicking that box at the top right corner (see the pic below).
b. another way is, see the rotation panel below (see the pic below), there are X, Y, Z, change the value that X, Y, Z to rotate “the mesh”
In my case, I put the X = 90 to rotate “the mesh”
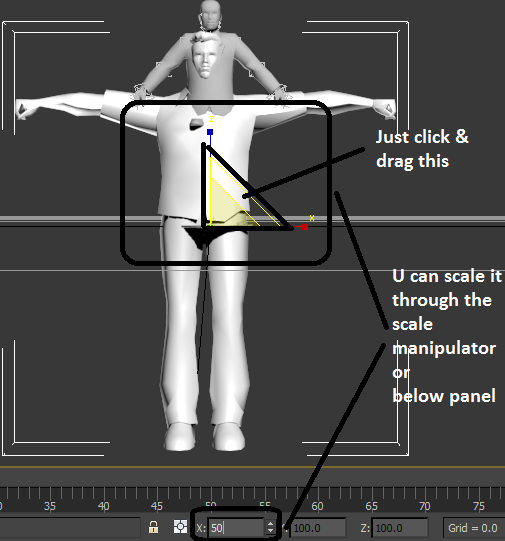
-Click “the mesh” and scale it until it match “the donor”, for scale just click “the mesh” and press “R Key” on your keyboard. There is two way to scale “the donor”, it basicly just like the rotation that I already explained before (by scale manipulator or scale panel below), in my case I scale it from 100 to 50
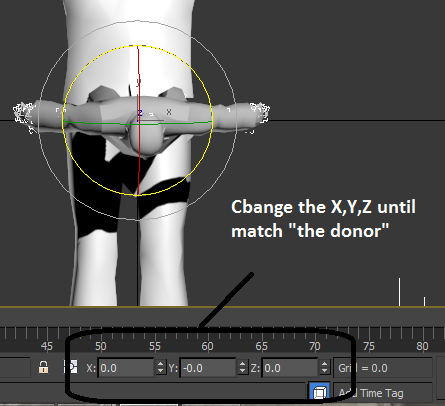
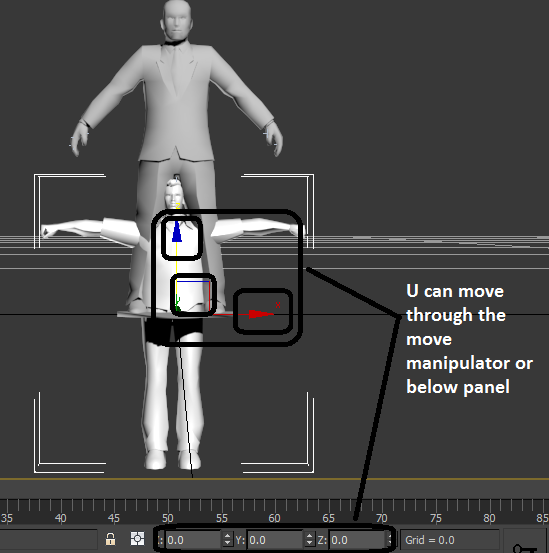
-Click “the mesh” and move it until it match “the donor”, for move just click “the mesh” and press “W Key” on your keyboard. There is two way to scale “the donor”, it basicly just like the rotation that I already explained before (by move manipulator or move panel below)
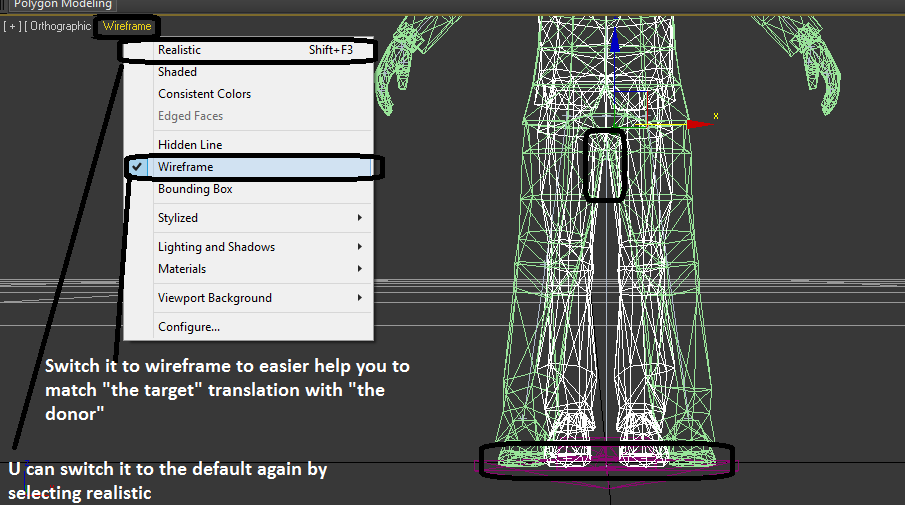
Note: you can change to the wireframe view to help you match "the mesh" with "the donor"
4. If all the transformation (rotation, scale & translation/move) already match, then we need to transform (rotate, scale & move) “the mesh” body part that is still unmatch with “the donor” body part, in this eg. It is “the mesh” hand & leg.

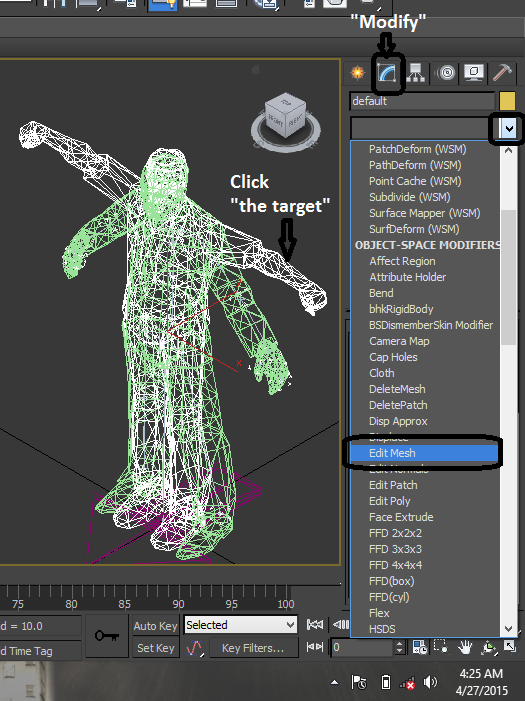
a. Enter the “Edit Mesh” mode,
-Click “the mesh” then click the “Modifier List” option in the right side panel, then search for “Edit Mesh” modifier.
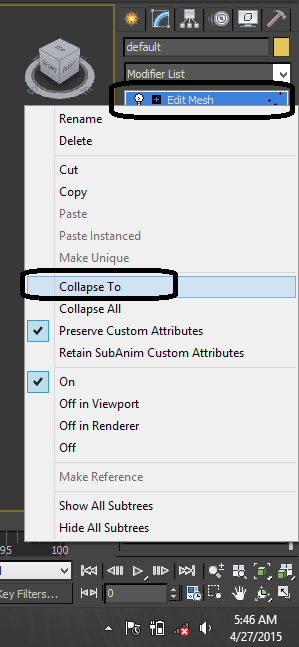
-Then LMB the “Edit Mesh” and select Collapse to
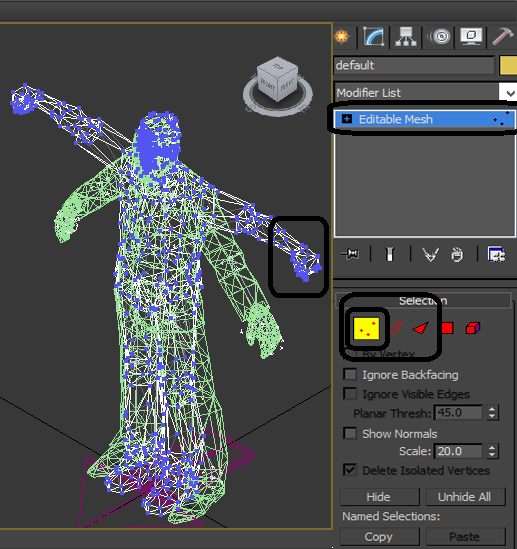
-Click the “Editable Mesh” and below the selection click the “Vertex” option. You will notice that the “the mesh” model shows up many blue dots, that blue dots is called vertex.
b. I will start from “the mesh” hand.
Note: we will only use “Rotate” & “Move” transformation
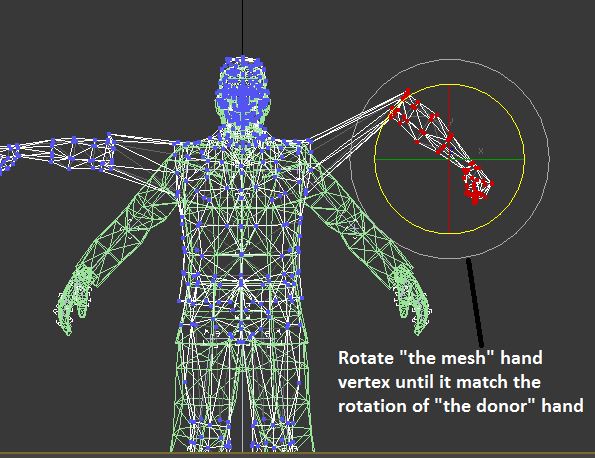
-Press the “E Key” to enter the “Rotate” transformation, then click and drag your RMB (Right Mouse Button) to select “the mesh” hand vertex

-the red dots is the selected vertex, rotate it until it match the rotation of “the donor” hand
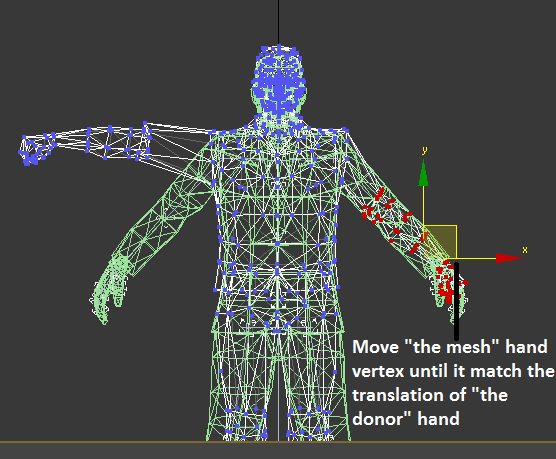
-Press the “W Key” to enter the “Move” transformation
-With “the mesh” hand vertex still selected, move it until it match the translation of “the donor” hand
c. do the same transformation procedure (rotate & move) for the other hand, and the two legs
Note: for advanced user, you can transform (rotate & move) both of the “the mesh” fingers to create a better rig.
5. After “the mesh” & “the donor” transformation match perfectly, now we can rig “the mesh”
-Exit the vertex mode by click again the “vertex” option at the right side panel below “selection” to turn off the vertex mode.
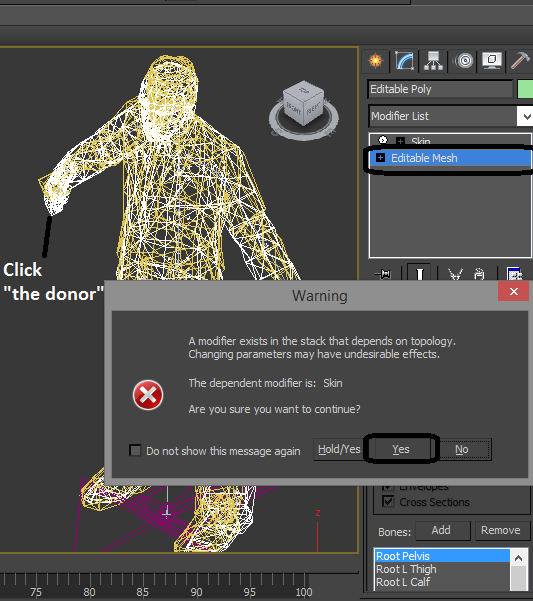
-Click “the donor” first, then in the right side panel click “editable mesh”. If there is warning shows up just click yes.
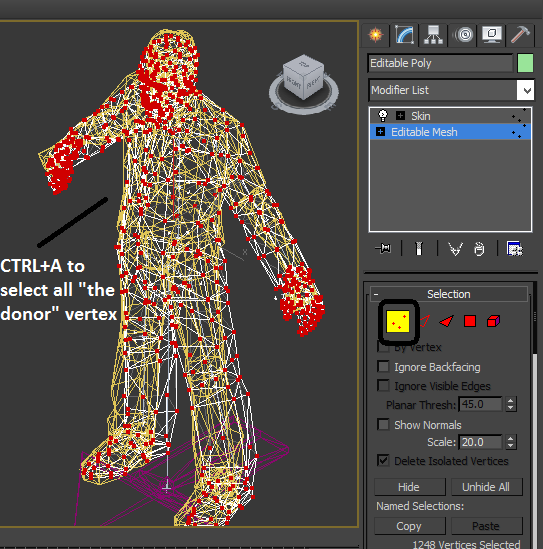
-At the right side panel below “selection” click the “vertex” option. Then select all “the donor” vertex by pressing “CTRL+A” on your keyboard
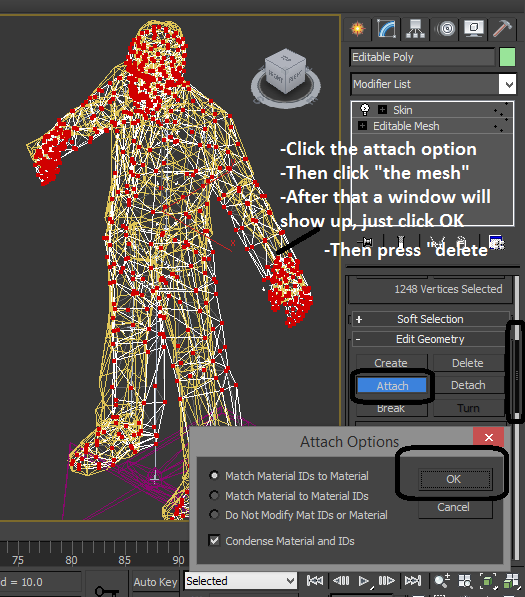
-then scroll down the right side panel until you meet “edit geometry” and below it there is “attach” option, click “attach” and select “the mesh”.
After that “attach options” window will show up, just click Ok, then press “Delete” on your keyboard to delete “the donor”. And now “the mesh” have a bone
6. But please note that the rig still contain bug, so we will clean it up. This process called “Weight Painting”
Weight Painting refers to giving a vertex some weigth that will be influence by the mesh bone.
Sorry guys, I didn’t write anything about this one, since it Is really hard to explain this, just using a mere word. So watch the GTA Rigging video above (that I attach to the mediafire) from min 04:06 to 09:54.
7. Giving “the mesh” a shader, so it will not look contrast ingame
-Change back to “realistic view” by pressing “SHIFT+F3”
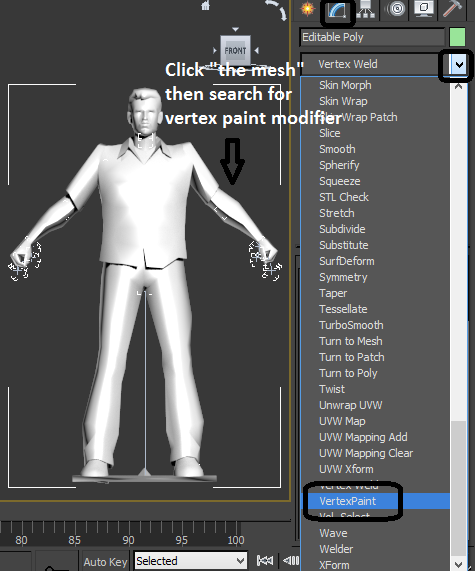
-Click “the mesh” , then click the “Modifier List” option in the right side panel, then search for “Vertex Paint” modifier.
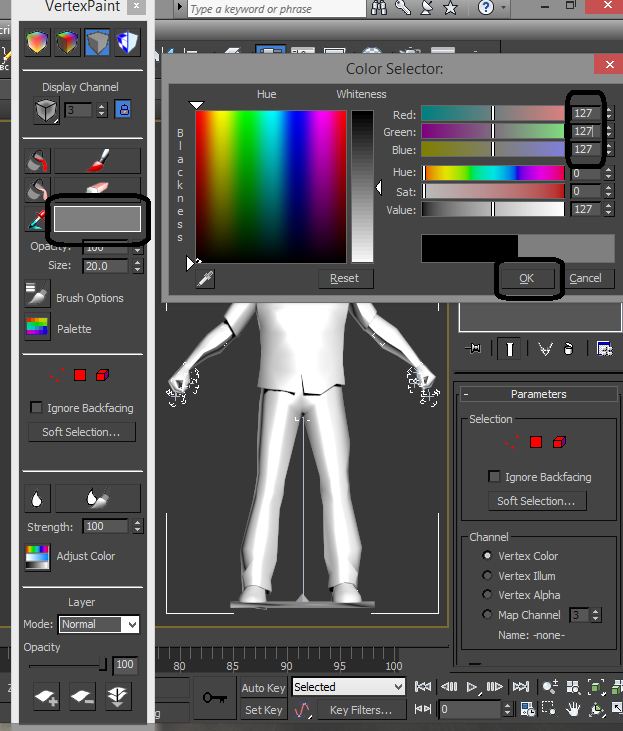
-The “Vertex Paint” window will show up, then click the “Color Pallete”.
The “Color Selector” window will show up, set the color value for “Red, Green & Blue”. to 127 (the middle value), then click Ok.
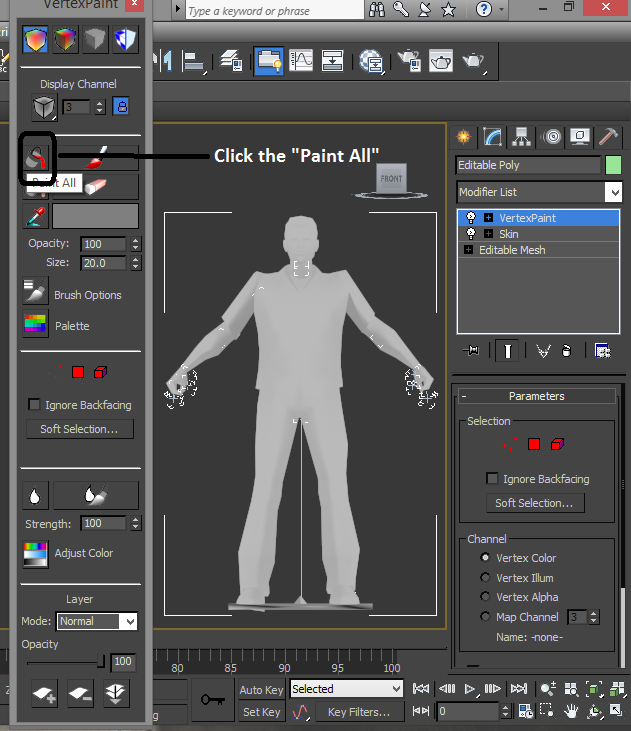
-Back to the “Vertex Paint” window, click the “Paint All” to set the vertex paint to “the mesh”. After that just close the “Vertex Paint” window.
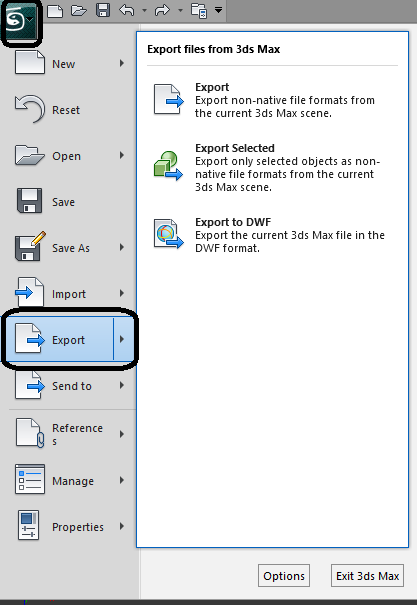
8. We are going to export “the mesh” now
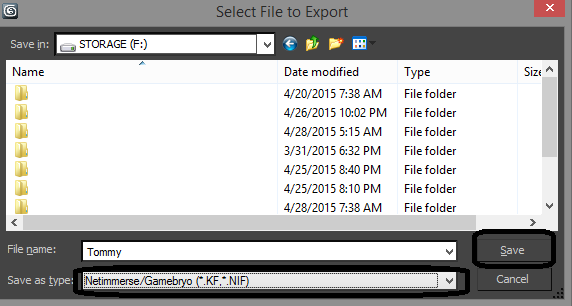
-Click “the mesh” and Export “the mesh” model. Choose a directory to save and set the save as type is “Netimmerse/Gamebyro (*.KF,*.NIF). In this eg. I named my modded rig “Tommy”
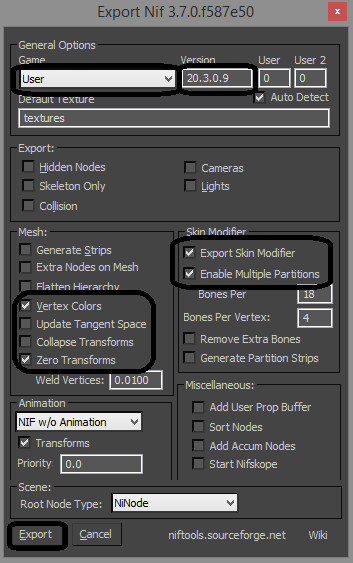
-Use this export setting below, change the “game” setting to “user”, change the version to 20.3.0.9 and please make sure you tick and untick according to these setting. Then click “Export”.
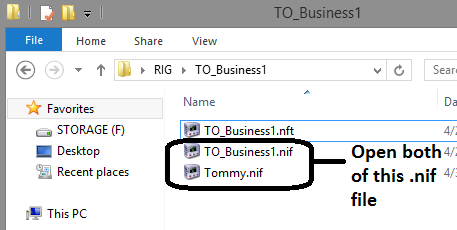
9. Since 3DS Max don’t have any proper .nif Bully:SE version importer/exporter, that means, the modded rig .nif file can’t work properly ingame. But don’t worry, there a way to overcome that problem.
a. First open both:
-The modded rig (“Tommy.nif”/ “the mesh” that we export out of 3DS Max before) and
-The unmodded bully ped (“TO_Bussiness1.nif”/ the original unmodded Bully:SE ped)
Note. If you had problem to open the second .nif file in the nifskope, just press "CTRL+N" to open a new nifscope window and click "load" in nifskope and select the second .nif file
b. Go to the “tommy.nif” file first, in the nifskope:
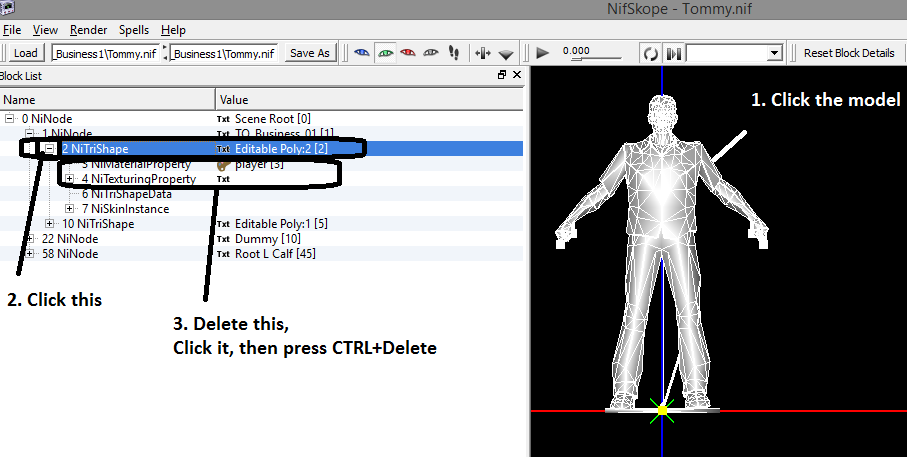
-Click the mesh, which is tommy.
-It will highlight the “NiTriShape” in blue in the “block list”
-Then in the “NiTriShape”, spread the nif tree list by clicking the “+”.
-It will shows up a lot of node (NiMaterialProperty, NiTexturingProperty, NiTriShapeData, NiSkinInstance, etc)
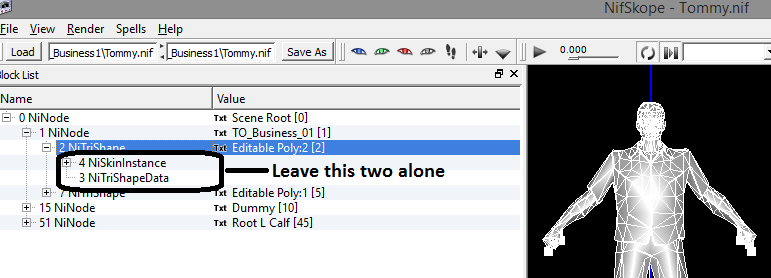
-Delete all the properties (for eg. Click the NiMaterialProperty then press “CTRL+Delete” to delete the properties), and only leave the “NiTriShapeData and NiSkinInstance”
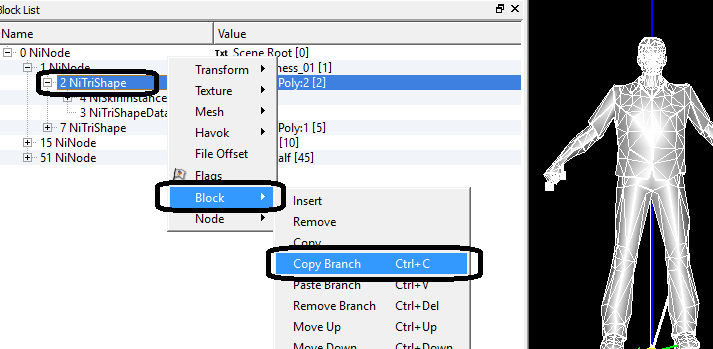
-Copy the “NiTriShape” by clicking the “NiTriShape”, then press “CTRL+C” or you can click RMB and select the “Copy Branch”. We will paste it to the unmodded original bully ped
c. Go to the “TO_Bussiness.nif” file (the unmodded original bully ped) that we already open before:
-Click the mesh, which business1
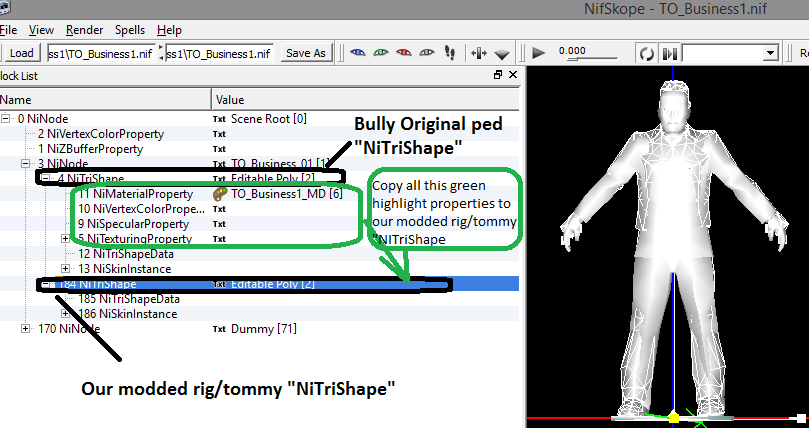
-It will highlight the “NiTriShape”. Above the “NiTriShape”, there is a “NiNode”.
-Click the “NiNode” and press “CTRL+V” to paste Tommy “NiTriShape” that we copy before or you can click RMB and select the “Paste Branch”.
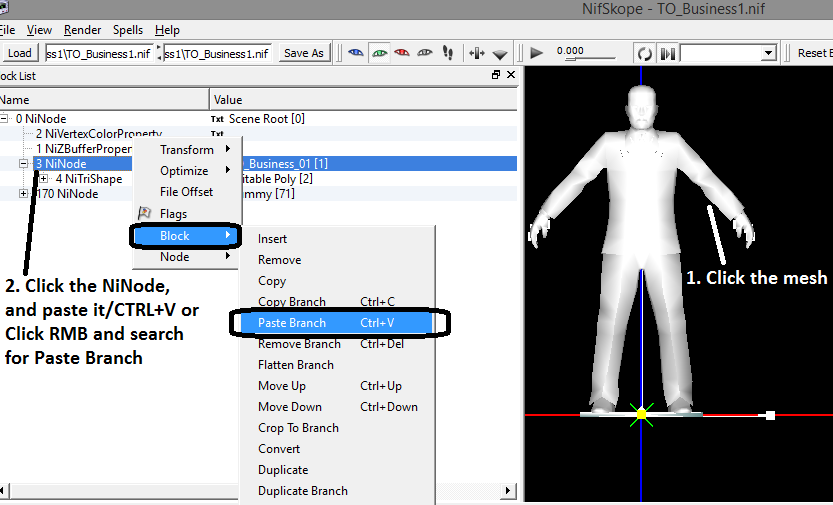
-There will be two “NiTriShape” shape, the bully original ped “NiTriShape” and our modded rig/tommy “NiTriShape”
-Now we need to copy all properties from the bully ped “NiTriShape” except the “NiTriShapeData and NiSkinInstance” to our modded rig/tommy “NiTriShape”, by using CTRL+C for copy and CTRL+V for paste.
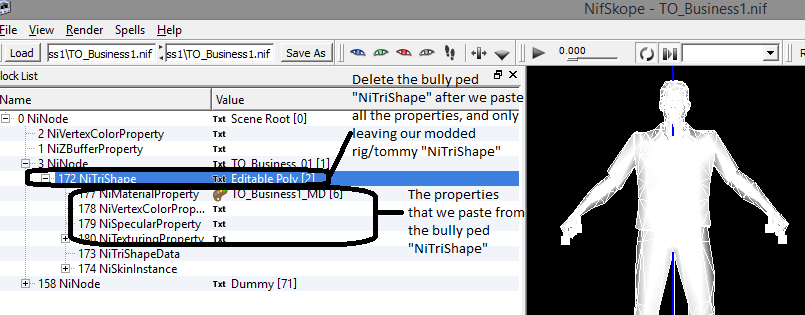
-After we finish copying all the properties to our modded rig/tommy, delete the bully ped “NiTriShape” cause we don’t need it anymore. And it will just leave our modded rig/tommy with the correct properties.
10. Assigning texture name in the .nif file, and still in "TO_Bussiness.nif” file,
Note: Bully:SE game can only read .tga file texture. if you have a texture for .eg .jpg or.png change it first in the photoshop, save as to .tga file texture.
Note: I only recommend you to use only photoshop when you converting your image
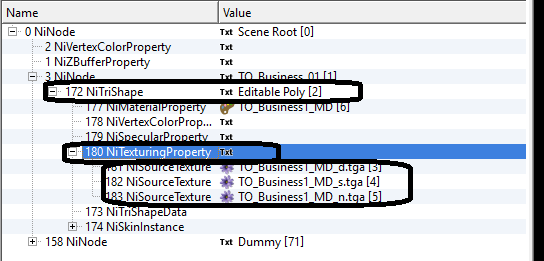
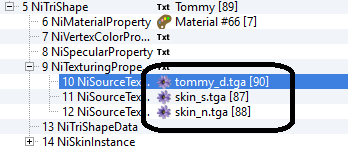
-In the “NiTexturingProperty”, spread the nif tree list by clicking the “+”.
-It will shows up a 3 “NiSourceTexture” ( _d.tga, _s.tga, _n.tga)
_d.tga = diffuse map/ this is the full color texture of the mesh
_s.tga = specular map/ it defines a surface shininess/shiny
_n.tga = normal map/ it stimulate the impression of a 3D surface
(Ps. You actually just need to understand the diffuse map, if you have no idea what is the other map, it is okay)
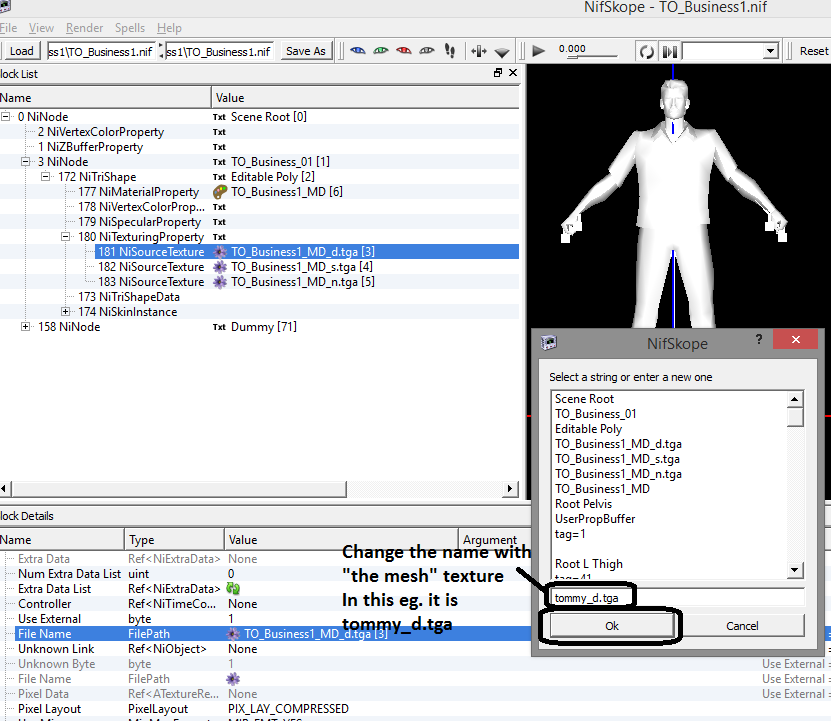
-First we need to change the _d.tga or diffuse map name to our “the mesh/tommy” texture name, look for the texture. In this example the diffuse texture name is “tommy_d.tga”
-In the _d.tga “NiSourceTexture” look at the “Block Details” below, scrool down until you found “File Name” and beside it there is a purple flower with the _d.tga name. Click RMB and select “Txt Edit String Index” and change the name to “the mesh/tommy” texture

-Change the name of the _s.tga into “skin_s.tga” and _n.tga into “skin_n.tga”, using the same method, like how to change _d.tga name. and the final result will be look like below picture. After that save the nif file (CTRL+S).
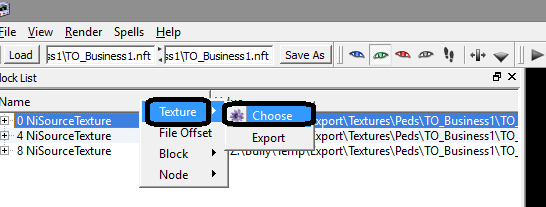
11. Importing all of your texture file (_d.tga,_s.tga,_n.tga) to the .nft file:
-open the original bully ped .nft file, in this eg. it is "TO_Business1.nft". Note: if you had problem to open the .nft file click RMB and select the “open with” nifscope.
-click and RMB the NiSourceTexture and select “choose”.
-Find the_d.tga texture, in this eg. It is tommy_d.tga.
-Click and RMB the NiSourceTexture again, and select “Embed”. You will notice that the “NiPixelData” will show up, delete the “NiPixelData’ (CTRL+Delete), since we don’t need it.

-Do it the same step for all the other file (skin_s.tga & skin_n.tga (note: both this shader texture can be downloaded above of this the tutorial step, in the tools section name “Rambo7 Universal Shader”).
Embed the texture and delete the “NiPixelData” if it show up.
-After you finish embed all the texture save it (It must be save in the .nft format)